Welcome to John's Blog World...

Welcome to my little sharing space--where I come to showcase some of my custom projects and to share "how-to" info with others out there. As a lifelong "maker", design enthusiast, and design professor, this blog explains some of the little projects I occasionally throw myself into, with the intent that I may help inspire others toward self-actualization and to show them how easy it really is to construct and realize their own ideas and dreams. As Brancusi said, "Create like a god, work like a slave."

Wednesday, October 06, 2010

Leather Case Construction--Part 1: Leather Forming

Another accessory that I wanted right away for my new iPod was a case. But, why would I want a case for something so "pretty"? Well, to me, the iPod's design doesn't really engender much confidence that it has the robustness necessary to survive the rigors of average human use. Experience proves that shiny surfaces never stay shiny (or scratch free) for very long, metal never takes big bumps without denting, and glass screens ain't all that impact resistant (even if they scratch less that smooth plastic ones do). Most folks will attest that, while the iPod sure looks good in those glossy ads, welling up heaps of gooey product lust in many a customer, it simply doesn't stay photo-ready for very long (at least, not without lots of anal-retentive care and attention)--especially when used in everyday situations. The aesthetic longevity of its casing design is about as practical to the everyday Joe as a super-model's hairdo is in a rainstorm. One quick remedy to this problem is to put the iPod in a case. Do a simple Google search for "iPod case" and you'll get a boat-load of hits...evidence that most users recognize the problems inherent with its design. Apparently, the iPod was really meant to be "encased" rather than "showcased"--at least by the typical user.
At any rate, in my search for an appropriate case for my iPod, I was intrigued by an Instructables post that described how to make a leather case for your iPod using wet, formed leather. I had been planning on doing some elaborate carbon fiber molded construction, incorporating rubber corner bumpers n' such for protection--which I'll probably still do sometime in the next few weeks anyway (I did an article for Make magazine on that very subject many moons ago). However, after reading that great post, I remembered some past experiences I had (some 25 years before) with my dear ol' dad's Tandy leather kit. It contained several tools, including a wooden hammer, stamps, punches, and rivet sets to make the sweetest western knife cases you'd ever set your eyes upon. But don't ask me what happened to the projects I actually made with it. They obviously weren't impressive enough for me to keep. Yet having been reminded of the possibilities of leather (and the lack of intricate molds otherwise required to make my planned carbon fiber case), I suddenly desired to further my skills in soft-goods design and reacquaint myself with the leather arts. After a couple quick attempts (with mixed results) I developed a little case that had a built in securement strap on the back. The iPod is rather petite and can easily slip out of my bear-paws. And since I frequently use it on the train during my daily commute, where getting inadvertently bumped by strangers sporting a three-day funk is the norm, I thought it would be a good idea to create a feature in the case that would prevent the possibility of stumbling and dropping my overpriced iPod onto the diseased floors of my local public transport. So my quick design solution ended up like this (both the bottom and top views of the case are shown here):
The strap is actually very comfortable and helps the iPod really "stick" to my hands, not to mention sit up on my desk for better readability. I've already gotten several comments from others asking me where I bought the case--which usually means one of two things: they thought it had high enough quality to be mass-produced by some company (which flatters my inner craftsman), and/or has some features they'd like in their own case (which flatters my inner design researcher). The strap in use looks like this:
When in the case, the Apple and iPod logo show through for intrigue (I guess you could say that it's somewhat similar to a halter-top or open-backed prom dress in that respect)...
...but can be easily removed by pushing the iPod up through the opening in the back of the case...
The biggest trick to making a case like this isn't so much in cutting the leather, or even stitching the pieces together. But rather, the difficulty usually comes in forming the leather to the proper shape prior to stitching and cutting. So, I thought I'd do a little demonstration on one method for making a simple wooden press to form the back piece of a case like this out of leather. This process entailed cutting a profile view of the back of the iPod into some wood (using plywood for dimensional stability when compressing wet leather)--while slightly over-sizing it to accommodate for the thickness of the leather case--and then creating an inner form that would stretch the wet leather, followed by clamping the entire assembly together until the leather took shape upon drying.
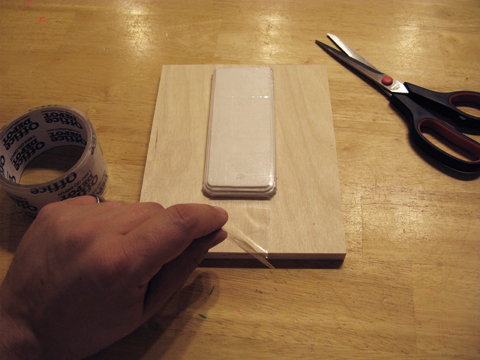
To get started, I took a piece of plywood (a little piece of Baltic birch ply is shown here, though pinewood ply works just as well, too) and traced the outline of the iPod onto it, as shown, to create the upper half of the press:
Next, I had to figure out the radii of the corners (since Apple's own site for case developers doesn't list them in the drawing of the iPod Touch (4th Gen). To figure these out, I used a circle template. With the offset of the leather thickness added in, a 3/4" diameter Forstner bit ended up hitting the dimension very closely.


I used a drill press in the shop to drill out the corners...
...and then followed up with a bandsaw to cut the sides of the upper press:
Since the bandsaw doesn't cut all that smoothly (even with a steady hand), it's best to use sandpaper (120-grit) and a block to clean up the sides a bit:
To provide enough relief at the edges of the press (to roll-over the leather, rather than crimp or gouge it), I then rounded the corners of the wood piece with sandpaper:
With that upper press piece cut, I could then get everything else together to form the leather. As shown here, I used some mat board (left over from a picture framing project), scissors, clear packing tape, leather, clamps, and a second piece of wood for the lower half of the press.
I traced the profile of the iPod onto the mat board as closely as possible...
...and then cut it into several layers to build it up to the same thickness as the iPod.
I cut some of the pieces slightly smaller than the rest to help approximate the corner fillet on the back of the iPod as the layers were stacked on top of each other. I then used the clear packing tape to join these pieces of mat board together, creating a water resistant form for the leather to stretch over.
I then taped this form to the lower half of the press...
...and then prepared the leather by soaking it in a shallow dish of water (as shown) until all the air bubbles came out of it. Some folks get all "huffy" at this point, because they'll say you can't use water on chrome-tanned leather, and that vegetable-tanned leather is the only way to go. This is only partially true. Chrome-tanned leather will still take shape through wetting and stretching, it just won't keep its shape as well as wet vegetable-tanned leather will. I've used both through this process and HAVE seen better results with the vegetable-tanned breed, but the other still works, too. So there you go...for what it's worth.
Once completely saturated, I put the leather over the form...
...applied the upper half of the press...
...moving and adjusting it to make sure that the leather wasn't "bunching" or loose over the form...
...and then added the clamps onto the wood press pieces to lock the leather down over the form:
I let this setup dry overnight, with a fan blowing on it to speed up the drying process. The wood does a good job of drawing some of the water out of the leather, helping the leather dry out relatively fast. Since the leather will still be malleable and formable if it is damp, allow it to completely dry before taking the it off the form. Once dry, remove the clamps and upper half of the press...
...and then remove the leather piece from the form.
This leather piece can now be punched, sewn, trimmed, and put into service. I'll demonstrate some of these additional case-construction steps in an upcoming post. Enjoy.

3 comments:

mlebagley said...

I am sitting here reading this with my jaw just dropped wide open! I LOVE the case..it looks so cool! You did a great job explaining how you created this sleek case and managed to make me chuckle out loud several times throughout. Wow!

savagesupply said...

I very much like that leather cases and I have an iPad but it's gathering dust, I've just never got on with it. I ended up buying a macbook air 13 inch case which I totally love. I can't find a 11" case for that though so it's looking a bit bashed already.

kristinahojholt said...

Have you ever thought about publishing an ebook or guest authoring on other sites? I have a blog based upon on the same information you discuss and would love to have you share some stories/information. I know my subscribers would enjoy your work. If you're even remotely interested, feel free to shoot me an e-mail. iphone leather cases