Welcome to John's Blog World...

Welcome to my little sharing space--where I come to showcase some of my custom projects and to share "how-to" info with others out there. As a lifelong "maker", design enthusiast, and design professor, this blog explains some of the little projects I occasionally throw myself into, with the intent that I may help inspire others toward self-actualization and to show them how easy it really is to construct and realize their own ideas and dreams. As Brancusi said, "Create like a god, work like a slave."

Wednesday, October 16, 2013

If You Give a Designer a Helicopter Ride...

There is a popular children's book that I occasionally read to my kids entitled "If You Give a Mouse a Cookie..." in which a boy feeds a mouse a cookie, only to find out that the mouse keeps asking for more and more human-like privileges. People can be strangely similar to the mouse in this book, in that certain insights can help open their eyes to possibilities in the world around them. I have seen this many times as an educator; once students find out how easy something is to do, their inhibitions quickly melt away and they're able to feel more empowered to pursue their dreams. Several pivotal experiences from my own life have occurred this same way, as happened to me last month when my sweet wife secretly coordinated donations from several of my friends for me to take a "hands-on" helicopter flight to celebrate my 40th birthday (as seen here in this photo of me getting ready for the flight):


People who know me best know that I prefer hands-on experiences rather than simply floating around in the realm of theoretical and conceptual ideas (unlike many of the folks I often come across in American academia). On this helicopter flight (my first helicopter flight ever) the instructor let me actually take the controls, perform some basic maneuvers in the air, and practice hovering over the tarmac prior to the instructor-assisted landing. After having that quick glimpse into controlled flight, I had a greater and immediate appreciation for the skills acquired by pilots, and especially helicopter pilots! To say the least, the act of piloting a helicopter is one of the most multi-tasking--and exhilarating--vehicle control experiences I've ever experienced! And by doing it myself (with the appropriate instructor oversight, of course), I felt instantly driven to be able to do it again. But I also knew that it wouldn't suffice to simply fly in the sky myself. As a designer, I knew I'd HAVE to build my own aircraft someday, for sure. I'd tasted the cookie...now I wanted the milk to go with it.

Suddenly my mind was buzzing with possibilities that I never thought were likely to happen. I've always been interested in flight, and had even toyed with the idea of going into the Air Force when I was younger. But life situations and my own personal apprehensions (as irrational as they may have been) kept me from pursuing the possibility of flight. After this first flight, though, the door felt like it was wide open. And so was my sketchbook. I started using all the basic knowledge I had in my brain about rotor aircraft to inform some of my initial design ideations. Admittedly, it helped that I'd assisted some of my students last school year in designing some gyroplanes (or "autogyro" aircraft) through a sponsored project with the Spain-based Phenix Aviation...so I was relatively conversant about several of the benefits and constraints of rotor flight. I knew about the comparatively high degree of safety inherent in an aircraft that derives its lift through rotor autorotation (using a rotor that spins as it is propelled through the air rather than being powered itself--which is especially helpful to safely control the aircraft back to earth in the event of an engine failure), so I decided that a gyroplane was the direction I wanted to start exploring. I joined the EAA (Experimental Aircraft Association), hoping to get more involved with other local aircraft builders and hobbyists, and then "went to town" sketching some concepts. (I'll probably get involved with the PRA, as well, here in the near future.) Below are some turbo-quick-n-dirty "napkin" sketches that I used to get some of my initial ideas out of my head as fast as possible: 


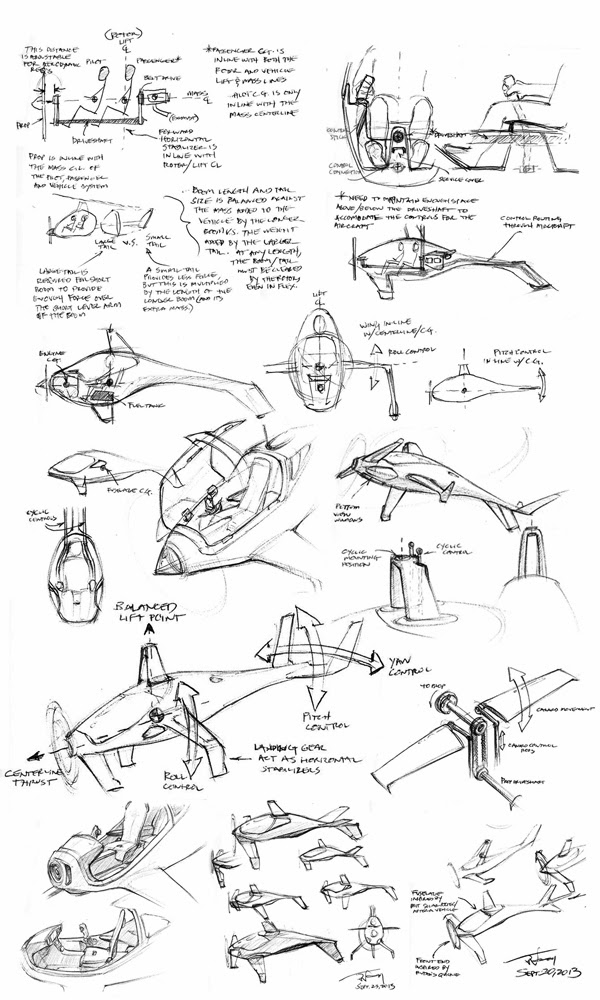
For aerodynamic efficiency and for a couple other practical design reasons (like weight distribution within the aircraft), I opted to design a two-person gyroplane with tandem seating, placing the passenger's seat directly under the lift point of the rotor. Additionally, I opted to have the propeller situated in the front ("tractor" style) verses the rear ("pusher" style) for better flight dynamics. However, in order to accomplish this with optimal placement of the aircraft powerplant, the prop would need to be belt-driven by a driveshaft that would run between the legs of the passenger and pilot--adding a little more weight and complexity to the aircraft, but also adding better overall flyability. (To counteract torque effects on the aircraft, I figure it may also be advantageous to configure the drivetrain so the driveshaft counter-rotates in relation to the prop--which will most likely require gearing between the shaft and the prop.) After about a month's time, I filled up over half of my current sketchbook, and needed to get another one. A very small sample of the design thinking that I went through is evident in this cute little collage of work from that sketchbook:


Next, to wrap my 3D mind around some of the forms and mechanical systems that I was contemplating for this gyroplane design, I filled an afternoon creating a few computer models in SolidWorks. (Note the low level of detail in these, as I was just modeling different configurations of the gyroplane to explore its potential layout rather than to perfect its design):


The latter of these three quick models (shown above) is the layout that I'm leaning towards since tail-dragging aircraft tend to land a little more easily on the ol' runway. But I'll keep working through the details. The next step is to create some scale models and do some wind-tunnel testing with our aviation department on campus--hopefully without all the aviation guys laughing at me for designing a gyroplane in the first place. (I've found that a lot of fixed-wing pilots have a slightly negative view of gyros, for one reason or another). At any rate, a remote control model would then be in order, followed by additional development steps toward a full-scale prototype. Since I'm approaching this as a long-term project, I haven't developed any time frame for completion. I still have to get a pilot's license, fer cryin' out loud! But my plan is there...cookie and all.

Tuesday, May 21, 2013

My Uber-workbench

As I mentioned in a previous blog entry, I recently got my own shop space...but now I need to make that space more usable by adding work surfaces and storage. It's natural to want all new equipment when getting a new space, but my teacher's salary says, "no way." In an effort to equip the new space with at least my minimum shop needs (without breaking the budget), I've been searching for sweet deals on used equipment all over the place, but have come up short. I'll admit that part of the problem is that I've got some very specific needs, and I like my stuff to last. In general, the typical mass-manufactured, one-size-fits-all equipment that is made of cheap materials and reeks of planned obsolescence leaves me with a not-so-happy feeling. I really just hate wasting my time and money on things I know won't work well or work long. Huge economies have been built on the philosophy of "throw-away" goods, but broader wisdom dictates that such a manufacturing model is not very sustainable, and it definitely is not more cost-effective in the long run. Given those constraints, then, I decided to do what any other able-bodied, money-strapped design instructor would do: design my own equipment. (I should mention here that I really only have this option at my disposal because I have access to some amazing shop spaces at work, so I'm able to build many of the things I need on a more flexible time frame than someone who doesn't have such resources.)

So, today's blog entry will showcase my latest equipment build: my "uber" workbench. (By "uber", I mean that it was my intent to build a robust, stout, mobile workbench with built-in storage that had strength and longevity surpassing that of other mass-produced options available to me.) And since I like to constantly improve on my shop talents, I opted to build the base for this new workbench out of welded steel, simply so I can improve my TIG welding skills--which were lackluster at best. Yes, I could've simply made the whole workbench out of wood. And, yes, I could have opted for a simpler welding method, like oxyacetylene or MIG welding, but I already had those skills under my belt...and TIG was a bigger challenge that would come in handy with some other future projects that I had in mind. So TIG-welded steel with a wooden top it would be.

With my limited budget, I planned on making the top of the workbench as a butcher block glue-up made from scrap wood pieces that our students had left in the woodshop at the end of previous semesters. I've been stockpiling such scrap for a while and gathered together all the maple-species boards and pieces I could from the gleaned bounty. (Not only is this cheaper for me, but it is also "greener", since I'd be using wood that would have otherwise ended up in the landfill..."waste not, want not", baby!) After sizing up all the pieces on the table saw and chop saw, I laid everything out and found that I had just enough wood to make a top that measured 24" wide by 60" long and 2" thick. Obviously, it would've been too perfect to have scrap wood that was all a consistent 60" in length, but I figured that I could make do with the short pieces I had at my disposal. All I had to do was glue all the shorter pieces to an adjacent longer piece, and then take each of these glued-up pieces to the jointer to square them up. I could then glue up all the pieces into either of two halves of a large butcher block slab (since the full-width slab wouldn't fit through the planer after glue-up), ensuring that everything was even and square each step of the way. My plan worked perfectly, albeit over several long hours. It takes much longer to glue up dozens of small scrap pieces than it does to simply process full boards straight from the lumber yard. Here's a shot of the joints (gaps and all)...not the prettiest glue-up job, but it was free!


After the glue had dried overnight, I passed each half of the butcher-block glue up through the surface planer to get a nice flat top, then squared up the long edges on the jointer prior to gluing the two halves together. The final butcher block top was nice and solid, requiring only a little gap-filling with some fast-cure two-part epoxy where there was space between some of the scrap pieces.

A final coating with some Danish oil and wax finished up the surface perfectly. I could have followed this finish with a nice polyurethane coating, but I knew what kind of work I'd be doing on this workbench and did't want to worry about scratching up a really nice finish--the top just generally needed to be sealed and able to resist resin spills from my composites work. Here's the final top:


All told, the top of the workbench top took about eight hours to complete, mostly because of how much time was required to process the wood scrap that I used to build it. (By contrast, a butcher block top made from "new" boards would have taken about half the time to complete.) But the results were worthwhile, for sure, and the top was as stout as any workbench would ever need to be.

Next, I needed to build the base for the workbench. Although it would be overkill to build the design in CAD (verses simply sketching it up on a scrap of paper), I opted to use SolidWorks to create the workbench "virtually" before physically building anything. Since I know SolidWorks' software very well, it helped me knock out the design quickly and then easily figure out how much quantity of material I'd need before starting. The base would need to be built in multiple pieces for easy transport in my car (since I don't have a truck yet), so I modeled up the design for the base as a four piece construction that could be easily transported and assembled onsite.

I decided to construct the base from 16 gauge 2"x2" square tubing--material that was easily sourced from a local metal supplier. Admittedly, using this gauge of material would mean that my workbench would be severely over-engineered, but who wouldn't want a massive factor-of-safety when weight isn't critical and the cost difference is almost negligible? I've never been one to "hope" that my designs are strong enough; unless weight and optimized performance are critical, it's much more comforting for me to know that my projects can sustain a direct nuclear blast without being harmed.

Strangely enough, it seems like I always need a project like this to remind me of how easy it is to build something robust out of metal. Wood is fairly easy to work with in its own right, but there's always the material selection step that takes a while...at least to find the right color, grain, and character of wood. Plastics and composites fabrication have their own benefits, but they require a lot of planning and expense to build anything structural from them. Metal, on the other hand, has excellent material consistency, and structural projects can be fabricated very quickly with just a few tools (and skills). After a few quick cuts with the abrasive saw, I was ready to start my TIG welding adventure. I'd heard from lots of folks that there are some similarities between oxyacetylene welding and TIG...but it took me a little while to get a feel for those similarities. After experimenting a bit with the welder's settings and my own technique, I finally started feeling like I was getting the hang of it a couple hours into my practice. There's nothin' like wielding a welding device to make you feel like you're messing with the molten forces of creation.


To make the best use of my welding practice, though, I did most of my "warm-up" welds on the interior joints of the base where I knew most folks would never venture to look. Here's one of my practice welds...a little uneven and "chunky", but effective:


This same weld looked much better after a little work with the angle grinder:


It took me about five hours to finish all the welding and final grinding of the welds of the exterior surfaces and adjoining assemblies. The results looked a hair better than beginner quality, but pleasing, nonetheless. I am no way an expert with the TIG welder yet, but I'd definitely "cut my teeth" with that more advanced welding tool and am much less apprehensive about using it in the future--which was one of the main points of this exercise. Here are the main pieces for the workbench assembly ready for powder coating:


I finished up the surfaces of the base with a nice black powder coating, using our powder coating gun and huge shop oven. To do this, I cleaned off all the surfaces of my weldments with acetone, electrostatically applied the powder to the pieces and carefully transferred them to the oven. Half an hour at full temperature and they looked great...like something off a showroom floor!


I then drove all the pieces home, assembled them, attached the wheels, and the workbench was ready for use! It could still use a few shelves underneath (which I plan to add in the near future), but it is now ready for some good use, as you can see here in my garage...


At less than $200 for all the materials, this project proved to be cost effective (though I didn't factor in my own construction time, of course), as well, giving me some learning experience with the welder while producing a fine, nearly-indestructible workbench.

I plan on using my new, developing welding skills in just a little while on some automotive pieces that I'm currently designing...so I'll post those as well once I've got them completed. Keep rockin', my friends.

Monday, January 14, 2013

My DIY "Value-of-the-day"

As most people know, I'm big into doing things for myself. I was into "DIY" way before it was a cute little social movement. In fact, I think I was just born with one of those stubborn I-know-I-can-do-it-myself-so-let-me-do-it-and-don't-stand-in-my-way personalities. I'll be the first to admit, though, that it's not always cost-effective to do everything yourself. Modern mass-manufacturing techniques are able to make things very cheaply and with a generally higher level of quality and even instant "replaceability" than can be replicated by most folks. If you spend a great deal of your spare time building up experience learning how to make things on your own, you can narrow that gap between the cost of mass-manufactured goods and the cost of doing something yourself...even if it takes a few years to build up the level of skill needed to get things done with a decently respectable level of quality. 
One area where the DIY cost-effectiveness gap quickly closes, though, is in the area of repair services. If you've ever "snaked" your own drain or replaced a leaky faucet, I'm sure you've seen huge savings over paying a plumber to do that same job for you (although I've heard that plumbers do have some enviably long snakes for those big, nasty drain issues), even if you may get a couple scraped or bruised knuckles in the process. Doing your own auto repair has some very similar cost benefits, as well. But, just like any DIY activity, it requires some practice and often some specialized tools. Which brings me to my latest personal DIY triumph: learning a new skill, acquiring new tools, and feeling a sense of serious accomplishment by performing a much needed car repair that I'd never attempted before...as I'll explain in today's blog entry.
About a week and a half ago, my car failed its emissions test. I actually had figured that it would, since a bad oxygen sensor had triggered the "check engine" light a couple months previously. For those readers who aren't too savvy with the car stuff, simply speaking, it is the oxygen sensor's job, in part, to help tell the car's computer how much fuel it needs to allow into the engine...and when the oxygen sensor goes bad, the engine can run "too rich"--with too much gas--to the point that the catalytic converter (the part of the exhaust system that helps catalyze--or "burn"--unburnt fuel) can't keep up to the extent that it basically wears itself out. I knew this at the time the sensor warnings showed up, but kept putting off the repair until, well, the damage was already done. When my vehicle registration came due and it was my turn to take the car in for emissions testing, I pretty much knew what was coming: a new catalytic converter. 
I'd never replaced a catalytic converter on my own before, and assumed that I'd have to do some cutting and welding to do the job right. Feeling a bit overwhelmed by the task, I got a quote from a local repair shop. They said they'd need $1290 to replace the catalytic converter, the oxygen sensors (turns out I have two of them...one before the catalytic converter, and one after it along the exhaust system), and all the relevant gaskets and clamps. This quote sounded a bit high to me...probably because the quoted amount was equivalent to the cost of an entire engine rebuild when I was a teenager. (Granted, things have gone up in cost over the years, but I still tend to gauge auto repairs costs on what they were twenty-plus years prior. Silly me.) After doing some research, I found out that, in actuality, my car doesn't necessarily require any cutting and welding; luckily, I've got a bolt-together exhaust system, so it's a much easier job to tackle. At least "easier" to the extent that I could actually attempt the repair myself without having to enlist the high-cost welding skills of somebody in a muffler shop. There was, however, the possibility that the job may not go as smoothly as anticipated and that I'd run into some hitches along the way. But I've worked through several auto-repair snags in the past and have generally come through unscathed...aside from a couple of low-grade scars on my big ol' ape hands. And I figured that I may even have to get a couple of new tools to complete the job--which is always an added bonus. (Nearly every automotive tool I possess actually originated from a car fix-it job that I'd performed sometime in the past...so I've got a rather large and useful collection nowadays.) 
Next I'd need to find a day where I'd have huge chunk of time (and courage) to get the job done. Well, the state emissions folks gave me a ten day window in which to complete the repairs without having to pay the emissions testing fee again (which was only $25, but 25 bucks is 25 bucks, dude!), so I knew I couldn't be too slow about getting the job done. But, as luck would have it, there was a huge cold front and snow storm that blew into town the day before I was to perform the repair--which meant that my garage would be frigid (a balmy 20 degrees F on the OK' thermometer) and I'd surely have melting snow and "funky" stuff dripping on me the whole time I worked under the car on the repair. But you do what you've gotta do to get these kind of things done. Or, at least I do. (Other people just pay for the convenience of sittin' on their duffs while a certified auto repairman gets himself all goopy doing the job for them instead...which seems both lazy and cruel to me. Call me crazy for feeling so responsible for my own messes or even for experiencing so much sympathy for another person who would otherwise willingly charge me good money to do that kind of work.) Since the weather had taken such a turn for the worse, I knew I'd need a propane heater for the shop. So I added that little item to the list. And I'd probably have an exhaust bolt (or five) that wouldn't come off without some serious torquing, so I'd definitely need to add an impact wrench to the list...along with a couple impact wrench-worthy extensions to reach deep into the engine. And while I was at it, I figured I might as well change the air filter, spark plugs, spark plug wires, and even the oil at the same time. (These latter items can generally help with the emissions, as well, at least to a small extent...especially considering they were overdue for service, too.) Adding all these additional items took a bit out of the savings I would have seen by doing the repair myself, but I knew I was definitely going to get a lot more bang for my buck out of the experience. Just so you can visualize the difference in the cost/value of the repair that I was attempting (factoring out the "convenience" factor of having somebody do the work for me), here's what the original quote would have gotten me (note that the catalytic converter and gasket shown are actually the old ones I took out rather than the new shiny ones I put in)...it includes the catalytic converter assembly, a gasket, two oxygen sensors, and two exhaust clamps:


Now, here's what I got by doing the job myself (at a cost of $1293.77...only about 4 dollars more than the original quote from the local auto mechanic), including all the new tools and emissions-improving parts that I'd be leveraging to ensure that I would pass additional emissions inspections for at least a couple more years to come...(shown below are the same catalytic converter assembly, gasket, oxygen sensors, and exhaust clamps, but also the shop heater and propane tank, an impact wrench with extensions, plug wires, plugs, a plug wrench, oil filter and oil--only one of the five quarts of oil used is actually shown here--along with a new air filter)


To prove that I actually pulled off this little repair (aside from the grime that's stuck in the skin on my digits), here's a scan of the original "failed" emissions test (note the cool "void" watermarks that showed up from the original document after I scanned it...didn't know that would happen but the novelty of it made me smile nonetheless):


...and here's the "passing" emissions results, performed exactly ten days later (and on one of the coldest days of the year--which is even more impressive since the car's computer tends to make the engine burn a bit richer on cold days):


To say the least, I feel a huge sense of accomplishment for this repair. I learned how to replace my own catalytic converter, I now know where the oxygen sensors are located (and how to replace them), and I have new plugs, wires, air filter, oil filter, and clean oil. What's even more useful in the long run is that I can do this repair again if necessary, and without the dread or fear of what it may entail. Plus I've got a new heater for my shop, a new impact wrench, and some other tool accessories to help out with other future auto repairs--which I'm sure will come in their own due time.
DIY rocks. And it can be cost-effective too. But only if you've got the intestinal fortitude to give it a shot. Word.