So, let’s say you’ve got an idea for a sweet design—a design that needs to be lightweight, weather resistant, inexpensive, and easily fabricated. Maybe it even needs to be clear, which would suddenly make this design a tall order to fill. Well, if you look at traditional materials to fit the bill, then you'll find that wood is lightweight and easy to work with in the shop, but it’s not all that weather resistant, and it sure ain’t clear. Metal is a durable, useful option, but it can require some expensive tools to fabricate parts with, especially if welded joints are required. On top of that, metal isn't transparent (unless you have some great top-secret leads on alien technology), and it can be heavy and have limited weather resistance, depending on the particular metal you select. But, If you want a prototyping material that fits all of these requirements at the same time, you might look into the "magical" world of wonderful substances we commonly refer to as “plastics”.
In modern life, we use plastics more frequently and extensively than most people even recognize, but they are often already formed into products and can be difficult to reuse or reappropriate for our own specific use—unless you know about thermoplastic sheet materials...like acrylic. Acrylic plastic (or polymethylmethylacrylate--PMMA--for those of you who want to use the long name to lay down the nerd card at your next Jeopardy party) is one of the most easily obtained and usable thermoplastics and is also sold under the trade names of Plexiglas and Lucite. Like many traditional building materials, acrylic has the benefit of being solid at room temperature and easily worked using common shop tools. But, unlike typical materials, acrylic can be quickly and easily formed with inexpensive heating tools--which opens up a world of shaping possibilities that other materials simply don't possess.
Acrylic plastics can be purchased in a couple of different forms, but for quick prototyping purposes using power and hand tools, it tends to be easiest to use in its common sheet form. Compared with traditional materials, it can be somewhat expensive in thick sections, or when large sheets are required, but is relatively cheap when procured in pre-cut sizes or as scrap. This can be helpful for the do-it-yourselfer who may be working on a small prototype or project, since these smaller scrap sizes are generally easier to transport, manage, and work with anyway. Acrylic sheet plastic is also available in many colors (either opaque or transparent), and can be easily painted using common automotive paints. One caution on using acrylic plastic, however, is that it doesn't have the same impact resistance as the plastics typically found in mass-manufactured consumer goods, like ABS, polycarbonate, or polypropylene. Therefore, take care to avoid dropping, overstressing, or overloading acrylic plastics since they can chip or fracture without much effort.
To demonstrate the ease of working with acrylic sheet, this blog posting will walk through the steps needed to fabricate a custom iPod Touch docking station (shown below). Although this docking station has a rather simple design, the methods shown here illustrate some of the common cutting, finishing, and forming steps that could be used to produce just about any prototype that would benefit from acrylic's useful material properties.

As a bit of background, I first started working with acrylic sheet when I was in a shop class in middle school--and I have to admit that I became totally enamored by the stuff. As I recall, the first project I made was a cheesy little 80's unicorn clock for one of my sisters. But I couldn't just stop there--the fabrication possibilities provided by acrylic were beckoning me to do even more. At the time, I was way into writing and illustrating comic books and started buying large pieces of acrylic plastic from my shop teacher so that I could make full-body suits of armor like the characters in my stories had. Luckily, I never had to go into battle with any of that plastic armor, but it sure helped me develop my skills in working with plastics at a young age.
When working with acrylic sheet, it's important to develop your design from the beginning so that it can be fabricated from flat stock. If you've got a design with all kinds of crazy compound curves and wacky form to it, you're going to be in for some serious headaches (although such shapes may still be possible with a lot of work--and assuming that you like the mental pain). However, if you intend for your design to rely on simple bends, flat pieces, or even modest glue joints, you should be able to make it without much trouble. Also, keep in mind that thicker plastics don't bend very well (or easily), so if your design has lots of tight bends in it, thinner plastic is advisable. Generally speaking, I shy away from plastic over 1/4" thick when I'm doing a lot of bending. Plastic that is around 1/8" thick works very well for most small projects like this.
To get started with this little demo project, I first created some quick sketches to explore a few shape and function possibilities for the docking station. I settled on a basic chair-like form that would proudly display the iPod while allowing for straightforward mounting of the stock Apple dock connector/USB cable to the finished acrylic base. Using these sketches, I cut and folded some paper to make a quick mock-up of the docking station so that I could be assured that the size and proportion was correct (see below).
To get started with this little demo project, I first created some quick sketches to explore a few shape and function possibilities for the docking station. I settled on a basic chair-like form that would proudly display the iPod while allowing for straightforward mounting of the stock Apple dock connector/USB cable to the finished acrylic base. Using these sketches, I cut and folded some paper to make a quick mock-up of the docking station so that I could be assured that the size and proportion was correct (see below).

Once I was content with my design direction, I unfolded the paper mock-up to make the cutting pattern for the plastic. I also used a pen and ruler to mark the location of the bends so I could reference these later in the building process.

Next I traced the pattern onto the acrylic sheet. Acrylic typically comes with a backing of either paper or plastic film on it to minimize scratches. It's usually best to keep the backing on for as long as possible during the fabrication process to avoid the hassle of unnecessary buffing and polishing to scratched surfaces. I like to transfer the bend lines onto the acrylic backing film as well, because it comes in handy later on to remind me where I need to make all those bends.
Acrylic cuts very easily with a table saw, but I recommend special plastics cutting blades to keep the plastic from blowing out (or chipping) as the blade cuts through the sheet. These types of blades are pricey, so a fine-toothed carbide blade can work well instead. Remember to always use a push-stick (shown below) when cutting narrow pieces!...it helps keep those digits where they belong. Heck, that's why I've still got mine today.

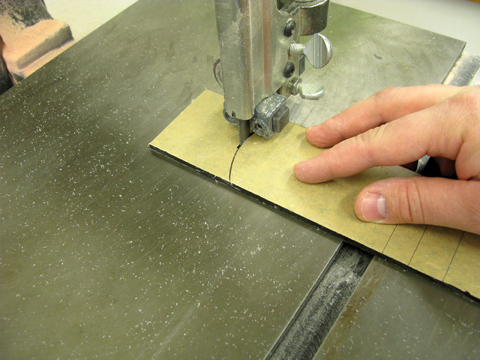
For curved cuts, the bandsaw works well. If I need to make really tight-radius shapes, relief cuts in the plastic can help keep the blade from binding around the curves. If the shape I'm cutting is just too insane for the bandsaw, I move my project over to the scroll saw since it's actually made to handle intricate and curvy shapes.


Word.
8 comments:
hi, John. My name is Molly. I'm a professor and a (new, recession-born) entrepreneur in Decatur, GA, wondering if you would be interested in my presenting a challenge to your students. (If you even can do this.) It's a design I'm trying to mock-up so I can have it manufactured; I don't know how to go about doing this but found your blog looking for "working with acrylic" and a few other words. If possible, could you e-mail me your e-mail, at molly.b@mindspring.com? Thank you; love your blog!
PS: Thanks for teaching me that acrylic also is known as PMMA. It will help me talk to the manufacturers whenever I do get my design mocked up.
Very nice John, I really appreciated the detailed explanation and photos. I am thinking about creating something similar for my Palm Tungsten E2 PDA. I did a quick Google search for photos of a Tungsten docking station when I discovered your "work of art." I use to make a bunch of stuff out of acrylic back in the late 80's and early 90's and spotted your craftsmanship right away. You should continue to blog such projects, both the work and the blogging are very nicely done. Take care and good luck. -Bob
wow!!!that's a real rocking look alike ipod dock stand man. that's really fantastic
its too nice thanks for sharing this post.
Plastic Prototyping
Rapid Precision Machining
Acrylic Sheets is one of the most easily obtained and usable thermoplastics. Its awesome to know this kind of Information.
When working with acrylic sheet, it's important to develop your design from the beginning so that it can be fabricated from flat stock.custom plastic injection molding
Plastic Injection Molding Company
Really interesting post! Thank you for helping people get the information about acrylic. Pioneer Cuts
Post a Comment